PowerEdge: Export SupportAssist collections using iDRAC

Generate SupportAssist Collections (TSRs) using the web interface

iDRAC7 and iDRAC8 firmware version 2.30 and above.
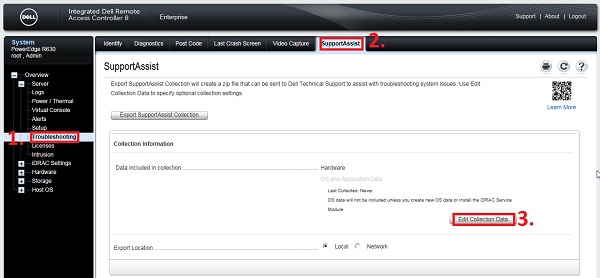
  1. Log in to the iDRAC interface. (Figure 1)
生成一个SupportAssist集合

Figure 1: iDRAC user interface

  1. Extension Server Overview → → Troubleshooting → SupportAssist. (Figure 1)
  2. Click Edit Collection Data. Select the data you want to include in the collection. (Figure 1)
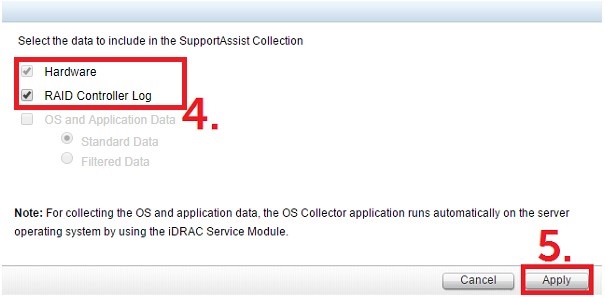
  3. Select the data you want to include in your collection. (Figure 2)
选择包含的数据

Figure 2: Collection settings

Note: For system and application data requirements, install and run the iDRAC Service Module (iSM).

Note: iSM is an optional software application that can include relevant system and application data in the SupportAssist collection.
Note: If (1) the iDRAC service module is not installed, the system and application data options will be disabled and not selectable.
  1. Click Apply (Figure 2.)
  2. Click to export support collection (Figure 1)
  3. The progress will be displayed. (Figure 3)

SupportAssist_Collection_Progress

Figure 3: SupportAssist collects progress


Note: Log collection typically takes approximately 15 minutes, but the exact time may vary depending on the customer environment. If it does not complete after a few hours, reset the iDRAC and try again. How do I reset the integrated Dell Remote Access Controller (iDRAC)?
  1. After the collection is generated, click OK. (Figure 4)

    集合生成后,点击确定
    Figure 4: SupportAssist collection complete.

  2. Specify where the SupportAssist collection is saved so that the SupportAssist collection can be sent to Dell Support.
Note: Updating your system's drivers and firmware may resolve many of the issues captured in the SupportAssist collection. See Learn more about updating firmware and drivers on Dell PowerEdge servers.

Use the racadm command to generate the SupportAssist (TSR) collection

iDRAC7 and iDRAC8 firmware version 2.30 and above.

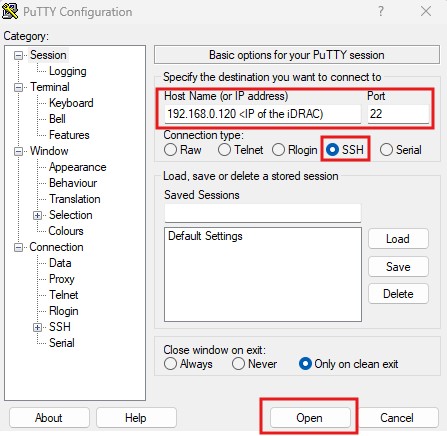
  1. Connect to iDRAC via SSH connection (use SSH client if needed)
腻子应用——开启与iDRAC的连接
Figure 5: SSH Application - Enable connection with iDRAC
  1. racadm
运行种族
Figure 6: Run the initial command。
  1. runracadm techsupreport generate -t SysInfo

[options for logs are added with comma (,) no spaces, logs are SysInfo [main log], TTYLog [Storage controller logs], OSAppAll [OS logs, available only if iDRAC Service Module [iSM] is installed on the OS and running]]

运行racadm命令只收集TSR主日志
Figure 7: Run the TSR collection command.
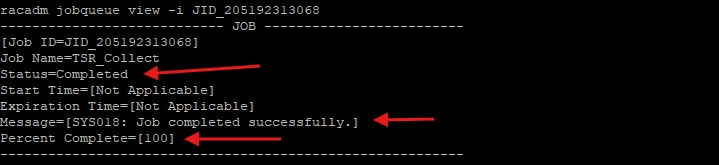
  1. Check the job queue to ensure that all files are collected completely
对集合运行的作业队列检查
Figure 8: Run the job queue view command.
  1. After the work is successfully completed, run it
    or racadm techsupreport collect -f <filename>.zip [Local save when run on the server]
    racadm techsupreport collect -l <your CIFS or NFS share name> [-u <your share username> -p <your share user password> as needed]

TSR的本地出口
Figure 9: Local exports
 
TSR远程输出
Figure 10: Remote export

Note: -f for file names is not required when using shared to save files.

Export SupportAssist collection using iDRAC9:

Note:How to Configure Integrated Dell Remote Access Controller 9 (iDRAC9) using Lifecycle Controller Network Settings Introduced how to configure Integrated Dell Remote Access Controller。
  1. 登录 iDRAC UI(图 1)。

iDRAC9 SupportAssist 收集菜单

Figure 1:iDRAC9 SupportAssist Collection Menu

  1. Click Maintenance, and then click SupportAssist(Figure 1).
Reminder: If the server is not registered with SupportAssist, the SupportAssist registration wizard is displayed. Registration is optional. If registration is not required, click Cancel, and then click Unregister. Registration must be completed to automatically send collection to Dell Support.
  1. Click Start a Collection(Figure 1)。
  2. Select the dataset you want to include in the collection. Optionally, proceed to the default selection.
Reminder: The iDRAC Service Module (iSM) needs to be installed and running for operating system and application data. For more information, see Support for Dell iDRAC Service Module. iSM is an optional software application that includes relevant operating system and application data in SupportAssist collection. If the iDRAC Service Module is not installed and running, or if the operating system BMC/iDRAC pass-through feature is disabled in iDRAC, the Operating System and Application Data option is disabled and cannot be selected.
  1. Collection preferences: Select the datasets that need to be filtered for personally identifiable information (Figure 2).

选择应针对个人身份信息进行筛选的数据集

Figure 2: iDRAC9 collection preferences

  1. Select the destination location where you want to save the collection.
Reminder: If you select the Save to network option, the provided network details will be saved as the default for all future collections.
Reminder: As of iDRAC9 firmware 7.0 and later, iDRAC SupportAssist collections can no longer be sent directly to Dell.
  • Save locally option to save the resulting collection on the local system.
Reminder: A message will appear asking you to save the compressed file so that it can be opened in your browser. Make sure this message is not blocked.
 
  • The Save to Network option saves the resulting collection to a defined CIFS or NFS shared location.
  1. Click Collect to continue collecting the build.
  2. Accept the End User Level Agreement (EULA) to continue with this process.
Remind:

没有找到想要的答案?

上传日志让 AI 帮你诊断,或者在控制台里直接向 AI 提问。

