Collecting Service Data on Lenovo ThinkSystem and System x servers
Use the XClarity Controller (XCC) to collect service data
Instruction
- Log in to XClarity Controller web management interface
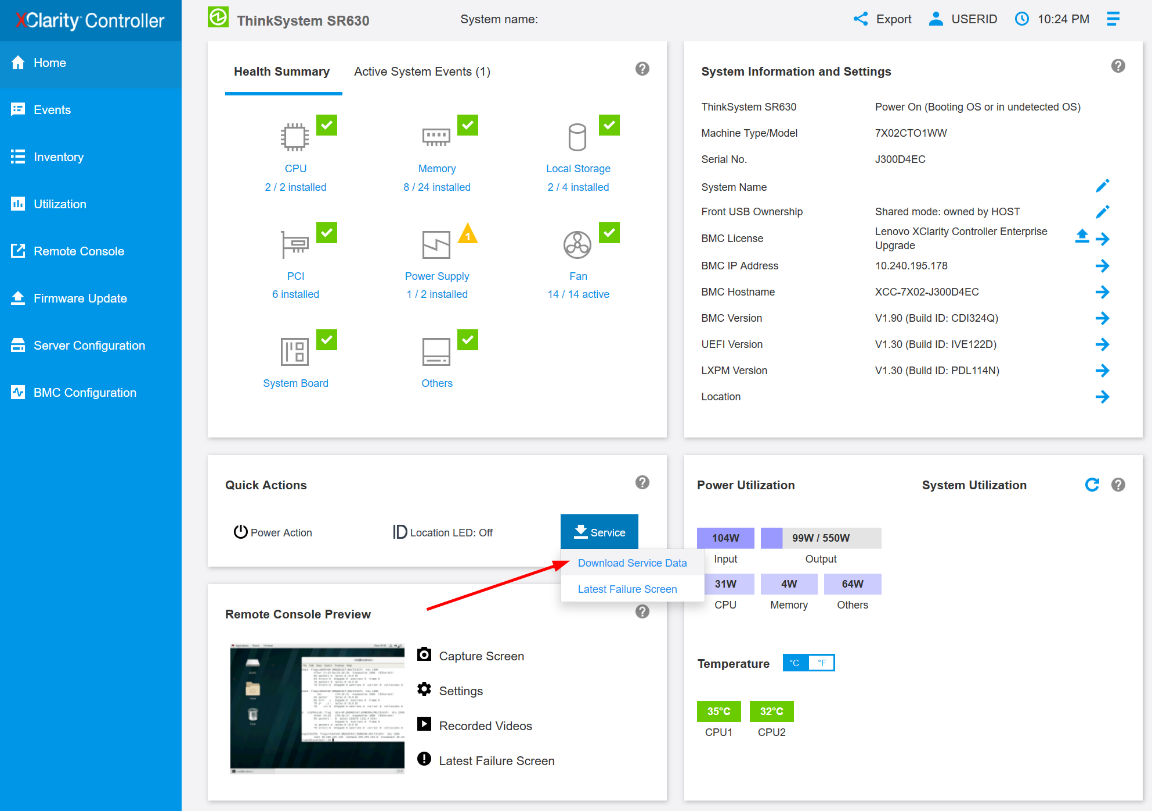
- On the Home page, look for the Quick Actions card
- Click on the Service dropdown menu, then Download Service Data
- Click OK when prompted
- This may take a few minutes to complete, then you will be prompted by the browser to save the file to your workstation.
Additional information
- The naming convention for the service data file is: MachineType+Model_SerialNumber_xcc_date_time.tzz
e.g. 7X1925Z000_S4AAC123_xcc_190325-104024.tzz - The XCC service data file *.tzz cannot be extracted using a generic decompression tool such as unzip or 7zip. Please send the service data file to authorized technical service personnel for further analysis.
- For additional information please see the following KB: How to use the XClarity Controller (XCC) to collect service data
Use the XClarity Controller (XCC) to collect service log for the last firmware versions and ThinkSystem V3
Instruction
- Log in to the XClarity Controller web management interface
- On the Home page, look for the Quick Actions card
- Click on the Service log
- Select Debug log, then click Export.

- This may take a few minutes to complete, then you will be prompted by the browser to save the file to your workstation.
Additional information
- The naming convention for the service data file is: MachineType+Model_SerialNumber_xcc_date_time.tzz
e.g. 7X1925Z000_S4AAC123_xcc_190325-104024.tzz - The XCC service data file *.tzz cannot be extracted using a generic decompression tool such as unzip or 7zip. Please send the service data file to authorized technical service personnel for further analysis.
- For additional information please see the following KB: How to use the XClarity Controller (XCC) to collect service log for last firmware versions and ThinkSystem V3
Use the XClarity Essentials OneCLI (LXCE) to collect service data
Instruction for Windows
- Download the latest version of OneCLI at the following location
https://datacentersupport.lenovo.com/us/en/solutions/lnvo-tcli - Decompress the downloaded zip file into a new directory
- Open a command prompt as Administrator and change to the directory where the expanded version of OneCLI is found
- Run this command to collect service data
OneCli.exe inventory getinfor -–ffdc - It will take approximately 15 to 45 minutes to complete.
- For more detailed information please see the following KB: How to collect system inventory and service data using Lenovo XClarity Essentials Windows OneCLI
Instruction for Linux
- Download the latest version of OneCLI at the following location
https://datacentersupport.lenovo.com/us/en/solutions/lnvo-tcli - Decompress the downloaded .tgz file into a new directory
- Open a shell as root privilege and change to the directory where the expanded version of OneCLI is found
- Run this command to collect service data
./OneCli inventory getinfor -–ffdc - It will take approximately 15 to 45 minutes to complete.
- For more detailed information please see the following KB: How to use the Lenovo XClarity Essentials OneCLI to collect system inventory and FFDC from Linux servers
Instruction for Vmware
- Please see the following KB: How to use the Lenovo XClarity Essentials OneCLI to collect system inventory and FFDC from servers using VMware
Additional information
- A new directory will be created under the current execution directory to store the result of each run at logs/OneCli-pid-date-time
e.g. logs/OneCli-5460-20190326-141910 - The result directory contains the service data file (.tgz/.tzz) that was gotten from the BMC, the same as by downloading service data from the web interface.
- It also contains a detailed server inventory file that could be useful to technical support. If you’d like to have the detailed inventory in HTML instead of the XML, you can run this command:
OneCli.exe inventory getinfor -–ffdc -–htmlreport - You may compress the result directory as a file to send to technical support
Use the XClarity Provisioning Manager (LXPM) to collect service data
Instruction
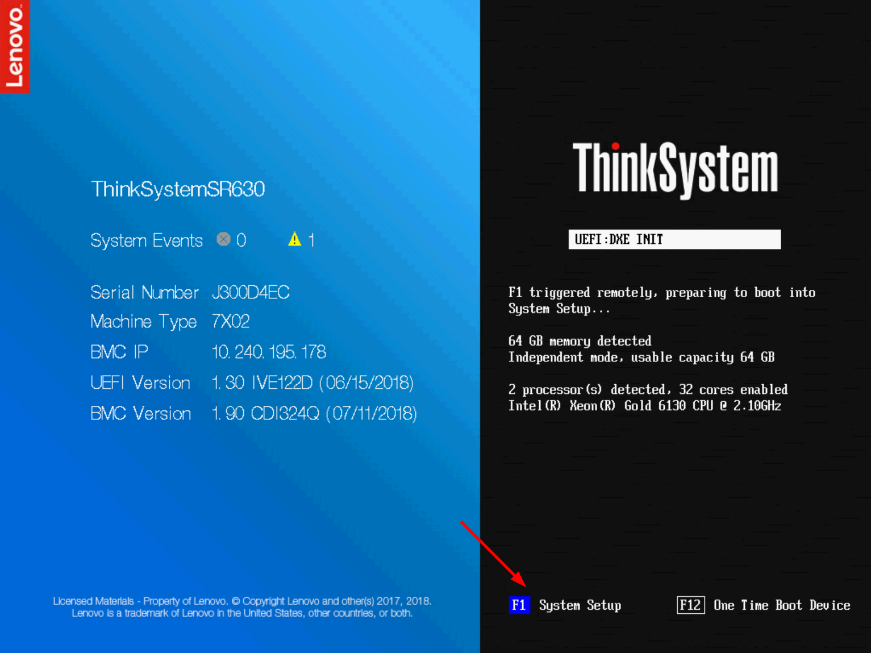
- Boot or reboot the server, and wait until the POST splash screen is displayed
- Press F1 for System Setup
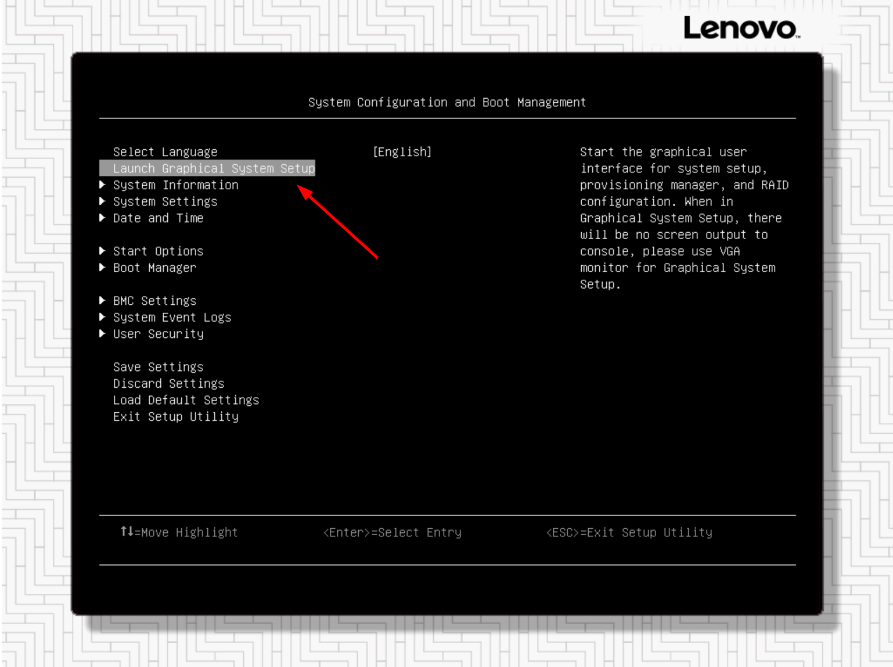
- If it shows the text mode UEFI setup, choose the option to Launch Graphical System Setup
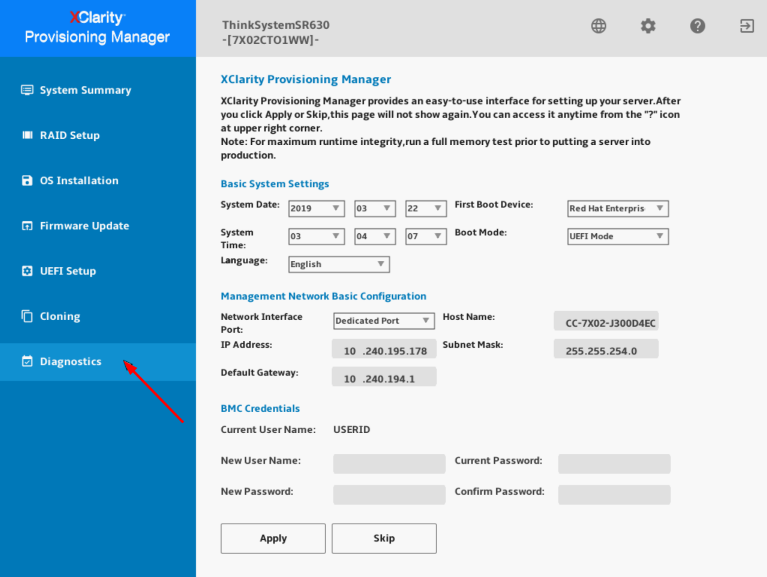
- After launching into XClarity Provisioning Manager (LXPM), click on Diagnostics
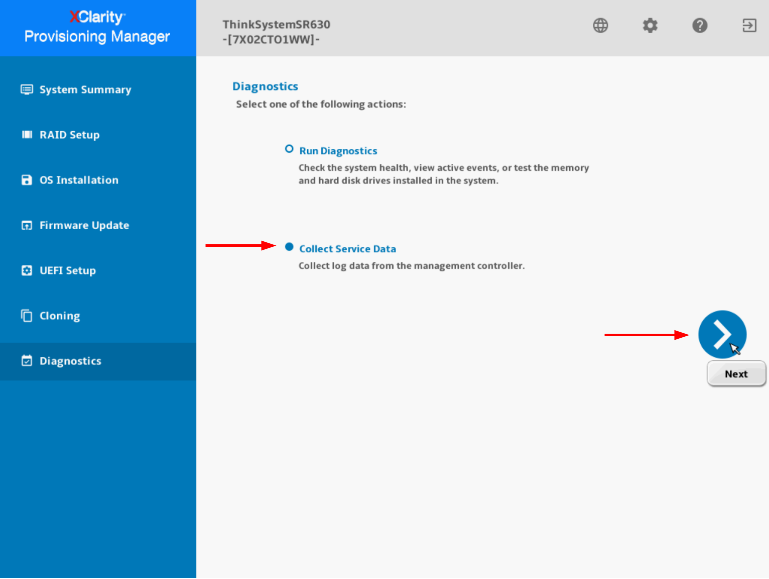
- Then choose Collect Service Data and click on the right arrow for the next step
- Keep going until it begins to collect service data and wait for it to complete the task
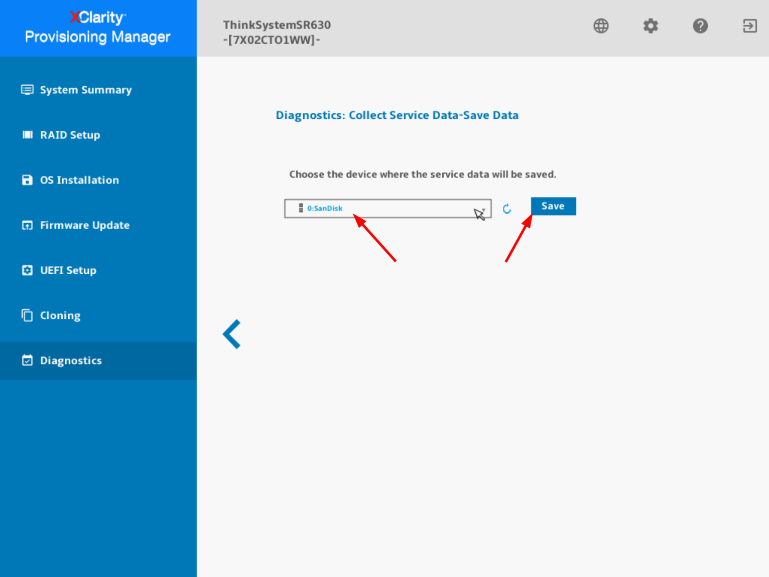
- Choose a USB drive in the list then click Save
- For more detailed information please see the following KB: How to use LXPM to gather system diagnostics
Use the Integrated Management Module (IMM) to collect service data
Instruction
- Log in to the Integrated Management Module (IMM) web management interface
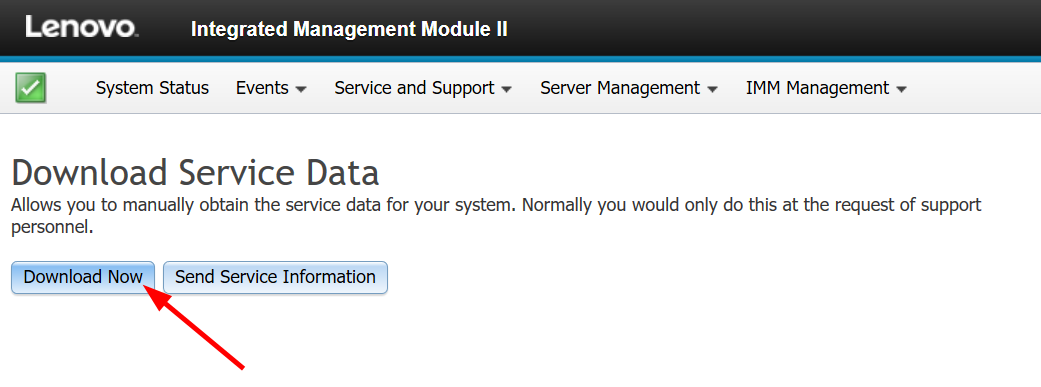
- Click on the Service and Support menu, then Download Service Data
- Click the button Download Now
- This may take a few minutes to complete, then you will be prompted by the browser to save the file to your workstation

Additional information
- The naming convention for the service data file is: MachineType+Model_SerialNumber_imm2_date_time.tgz
e.g. 5465AC1_06BMZEV_imm2_20190321_042452.tgz - The IMM service data file *.tgz cannot be extracted using a generic decompression tool such as unzip or 7zip. Please send the service data file to authorized technical service personnel for further analysis.
- For more detailed information please see the following KB: How to collect service logs from within the IMM
Use the Dynamic System Analysis (DSA) Preboot to collect service data
Note: DSA Parser has reached its end of life and no longer be available since February 2025.We recommend customers generate log files using LXCE OneCLI.
- For instructions on how to use it, see OneCLI Logfile Instructions .
- Visit the LXCE Landing page here.
Instruction
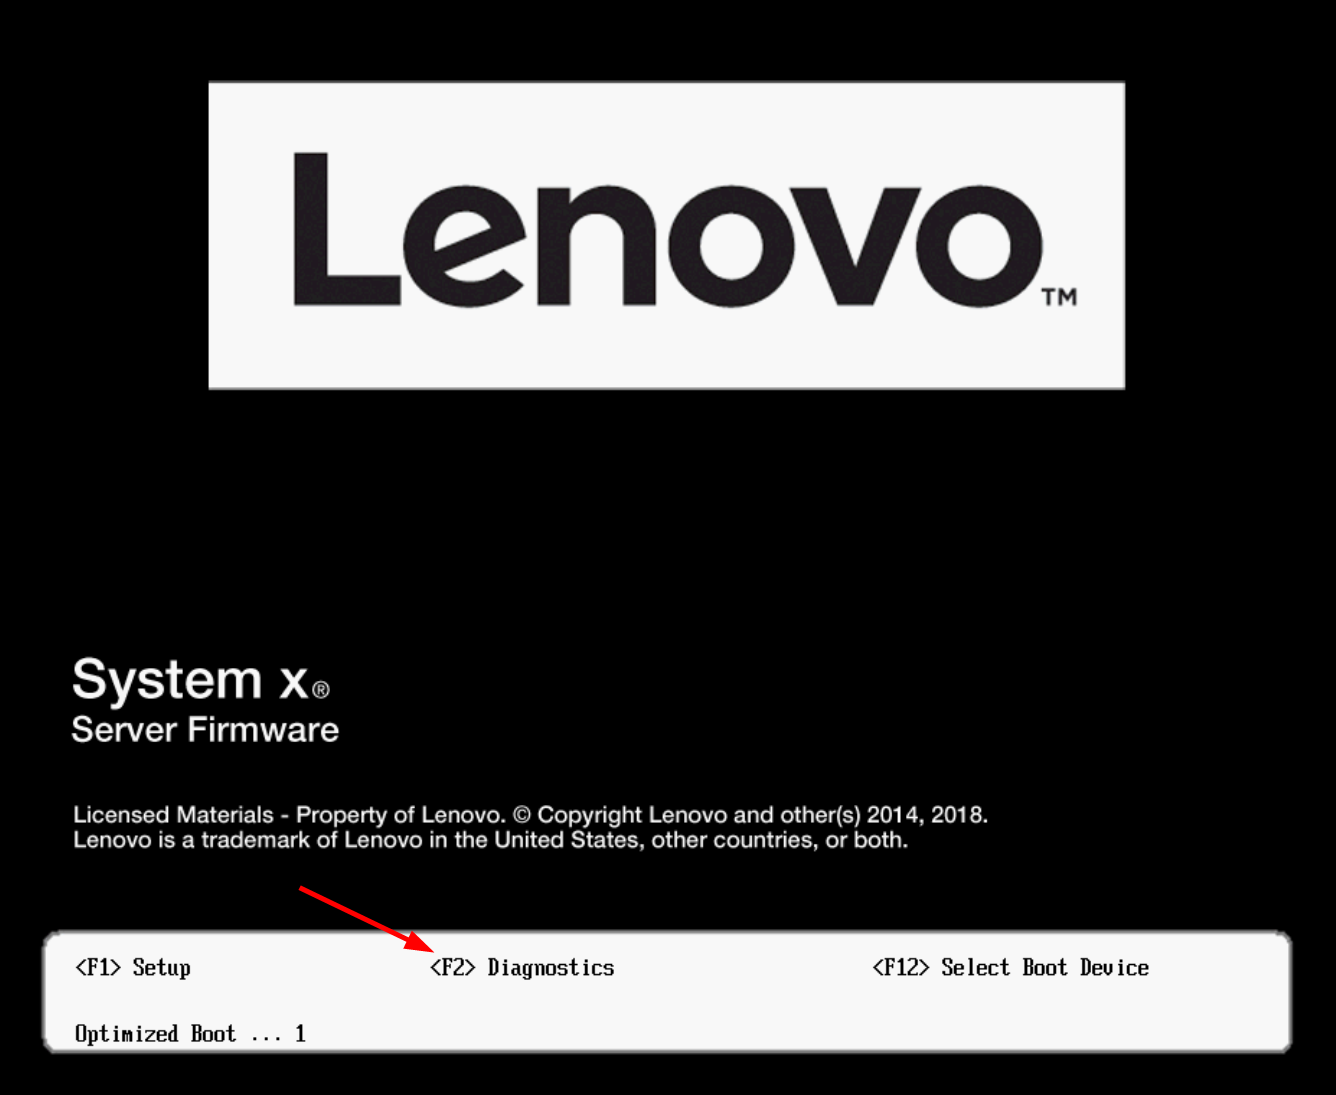
- Boot or reboot the server, and wait until the POST splash screen is displayed
- Press F2 for Diagnostics
- It will show the Memory Test screen first, choose Quit > Quit to DSA
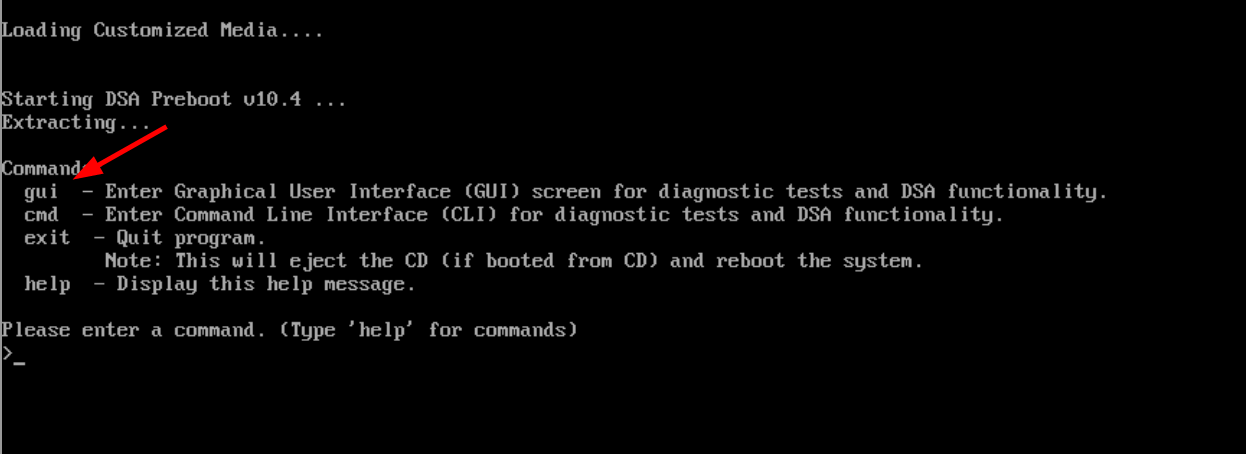
- Then DSA will launch with a text screen prompt, type gui and press Enter
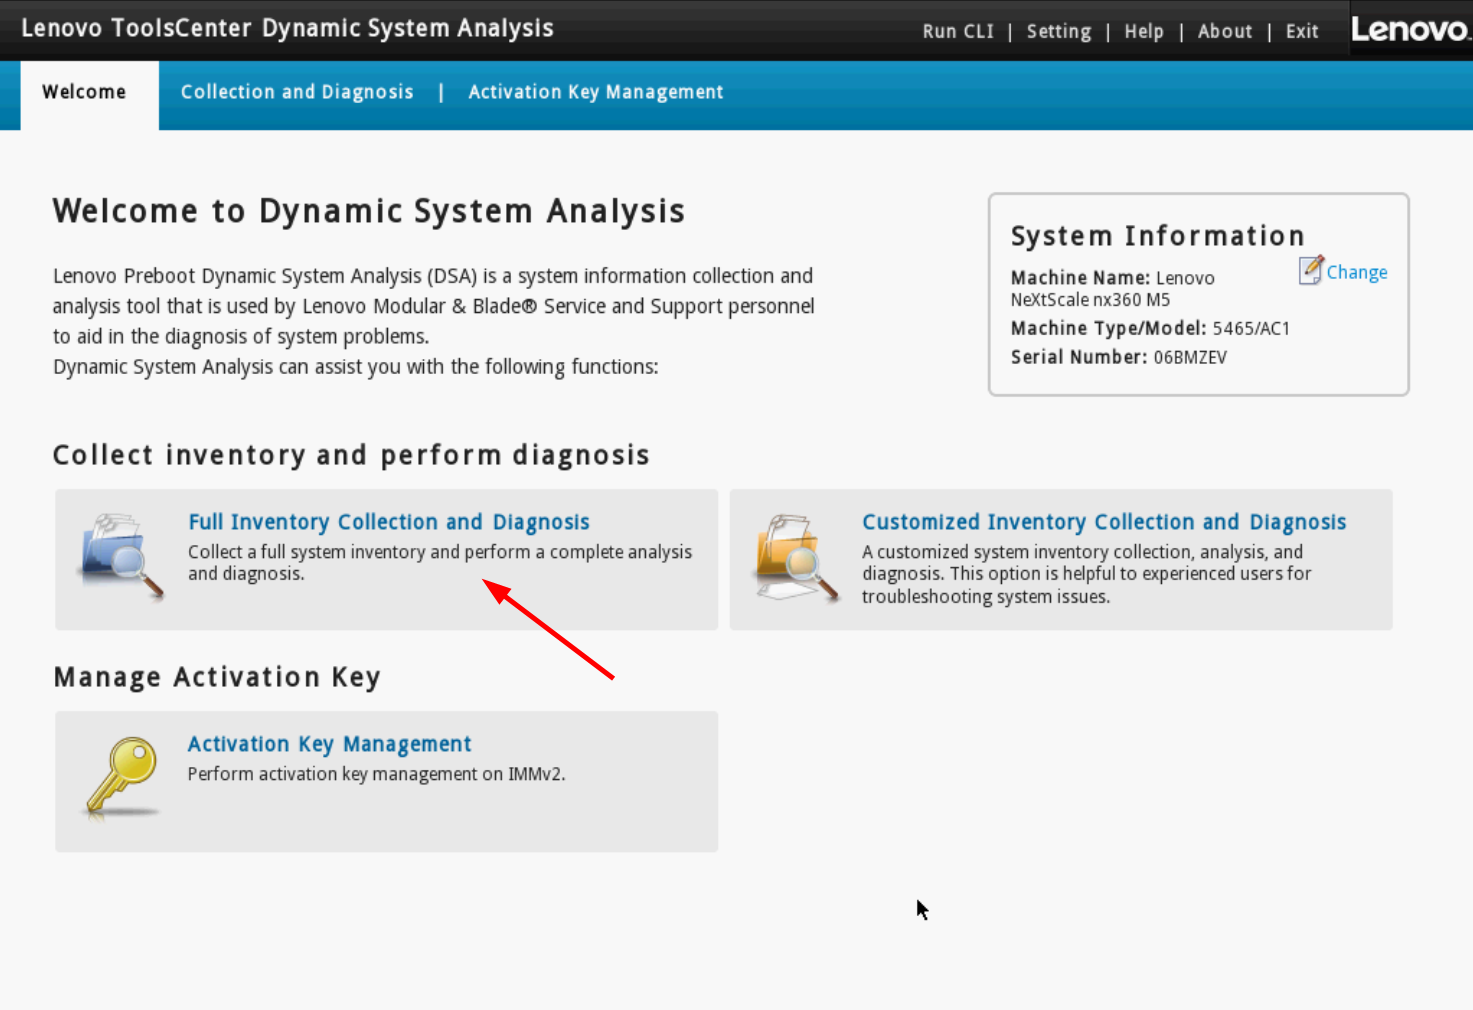
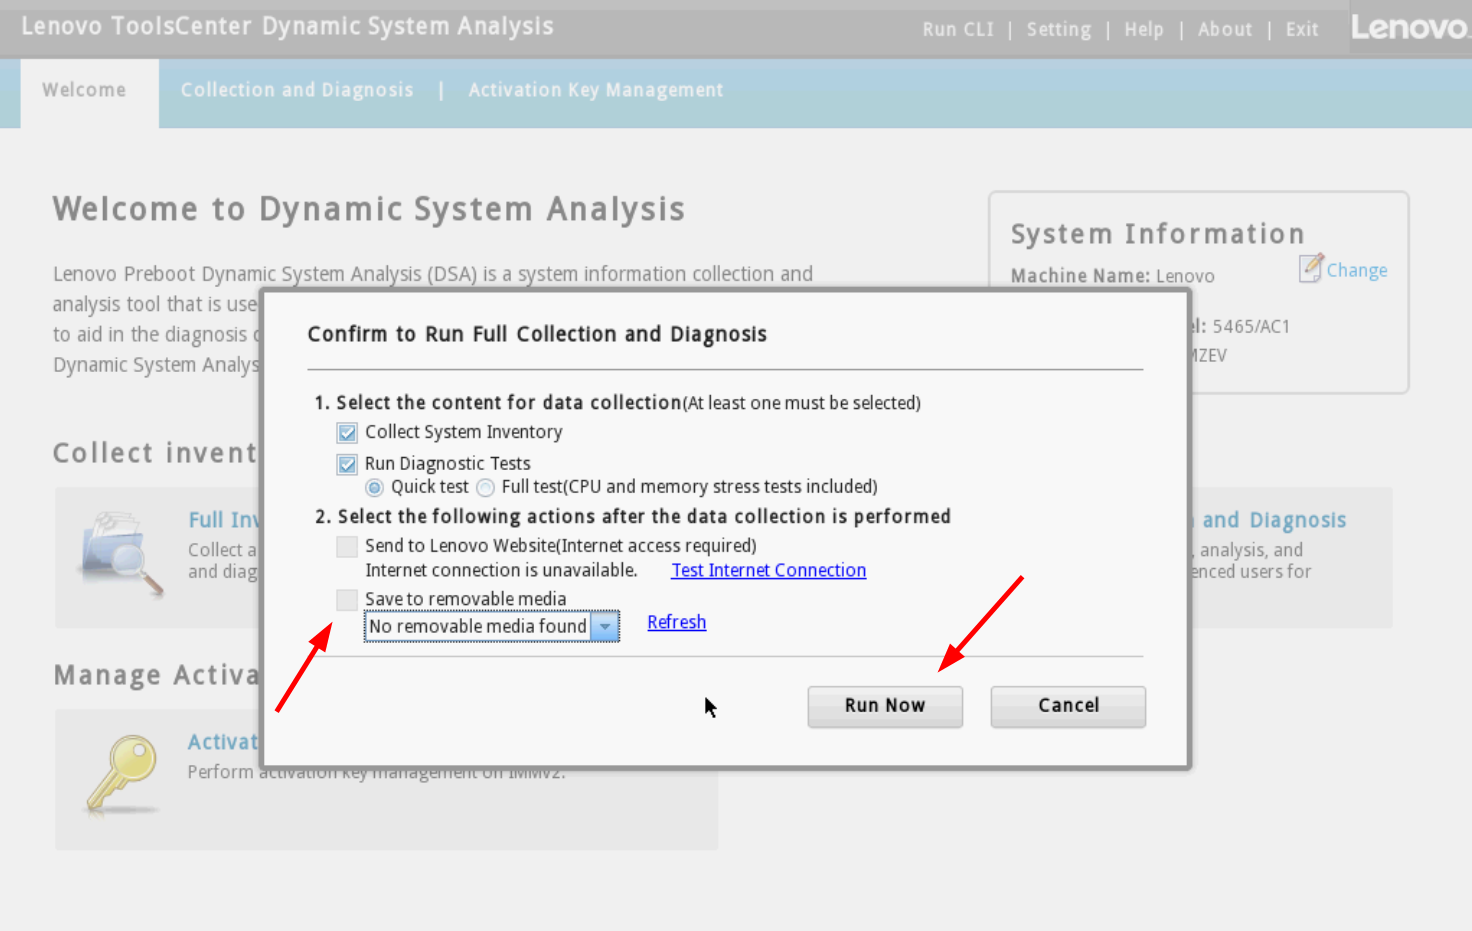
- At the graphical DSA welcome page, click on Full Inventory Collection and Diagnosis
- Select a target location to save the service data file, then click the button Run Now
- The task will take a few minutes to complete, if you have not chosen a target location at the previous step, you may click the button Save to now.
- For more detailed information please see the following KB: How to collect service logs on a local system using Dynamic System Analysis (DSA) Preboot

Use the Dynamic System Analysis (DSA) Portable to collect service data
Note: DSA Parser has reached its end of life and no longer be available since February 2025.We recommend customers generate log files using LXCE OneCLI.
- For instructions on how to use it, see OneCLI Logfile Instructions .
- Visit the LXCE Landing page here.
Instruction for Windows
- Open DSA in your system. If you don't have it yet, we recommend using LXCE OneCLI to replace DSA as noted above.
- Open a command prompt as Administrator and change to the directory where the DSA executable file is found
- Run this command (the actual file name might vary slightly as the version changes):
lnvgy_utl_dsa_dsala7j-10.4_portable_windows_x86-64.exe -–ffdc - It will take several minutes to complete, approx. 15 – 45 mins.
Instruction for Linux
- Open DSA in your system. If you don't have it yet, we recommend using LXCE OneCLI to replace DSA as noted above.
- Open a shell as root privilege and change to the directory where the DSA binary file is found
- Make the binary file executable: (actual file name might vary slightly as version changes)
chmod +x lnvgy_utl_dsa_dsala7j-10.4_portable_rhel7_x86-64.bin - Run this command:
./lnvgy_utl_dsa_dsala7j-10.4_portable_rhel7_x86-64.bin -–ffdc - It will take several minutes to complete, approx. 15 – 45 mins.
Additional information
- A new directory will be created to store the results at
Windows: C:\Lenovo_Support
Linux: /var/log/Lenovo_Support - The result directory contains the service data file (.tgz/.tzz) that was gotten from the BMC, the same as by downloading service data from the web interface.
- It also contains a detailed server inventory file that could be useful to technical support.
- You may compress the result directory as a file to send to technical support.
Use the XClarity Administrator to collect service data
Instruction
- Log in to the XClarity Administrator management interface
- Click on the menu Administration > Service and Support
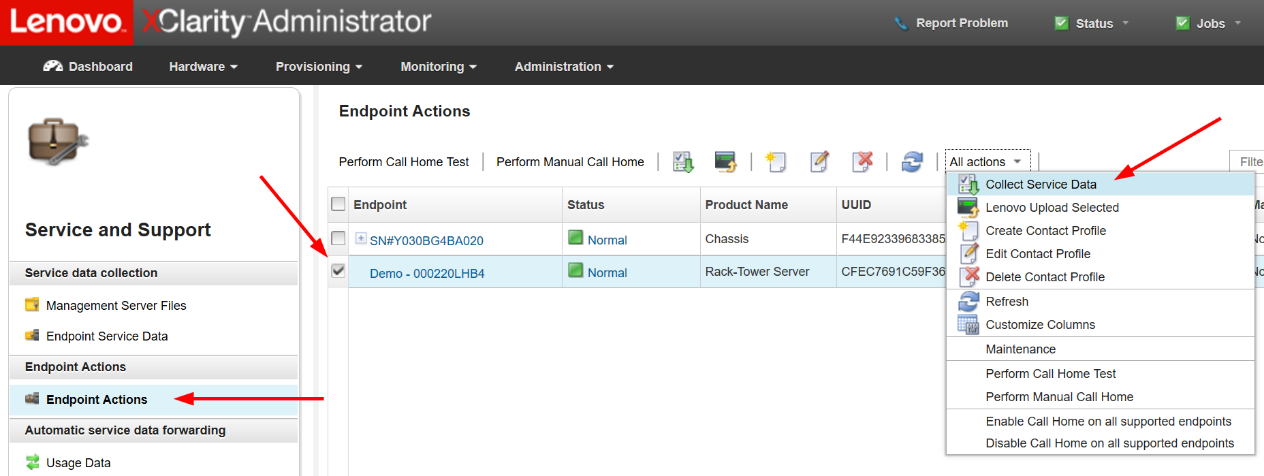
- In the Service and Support page, navigate to Endpoint Actions
- Select one or more endpoints on which you’d like to collect service logs, then click the menu All Actions > Collect Service Data, and confirm the action when prompted.
- The task will be launched in the background and should take a few minutes to complete
- To download the service data file to your workstation, navigate to Endpoint Service Data
- Select one or more files then click on the toolbar button or the equivalent menu in All Actions > Download Selected Service Files.

Use the Flex Chassis Management Module (CMM) to collect service data
Instruction
- Log in to the Flex Chassis Management Module (CMM) web management interface
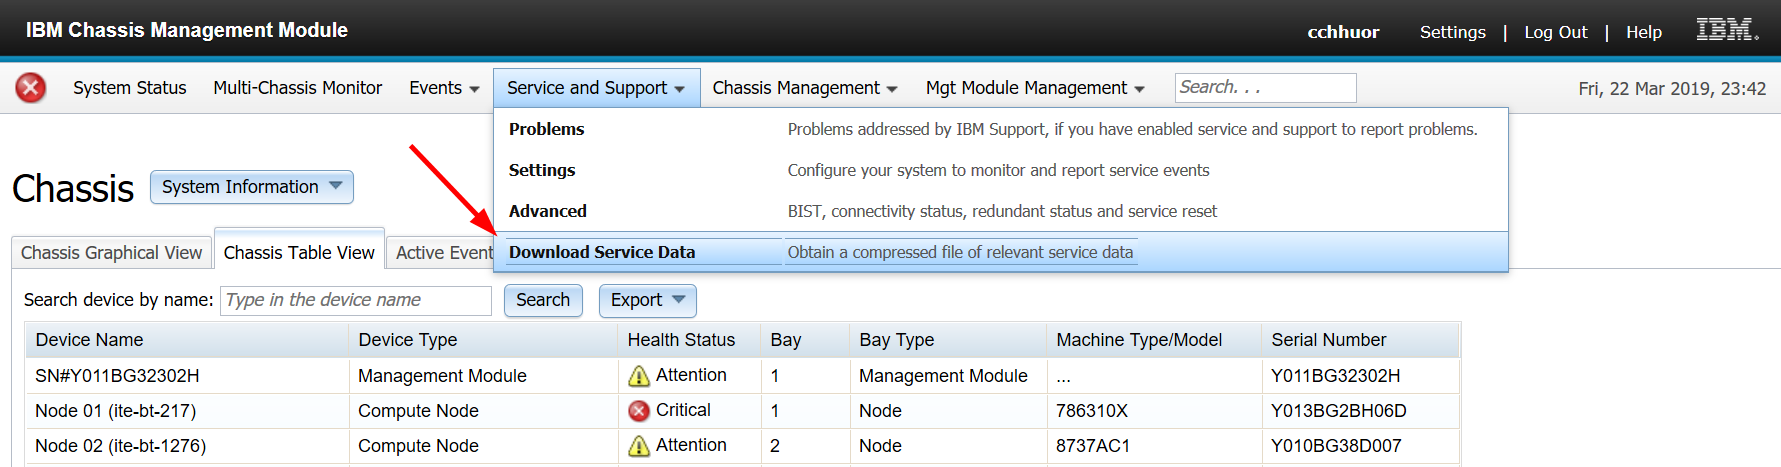
- Click on the Service and Support menu, then Download Service Data
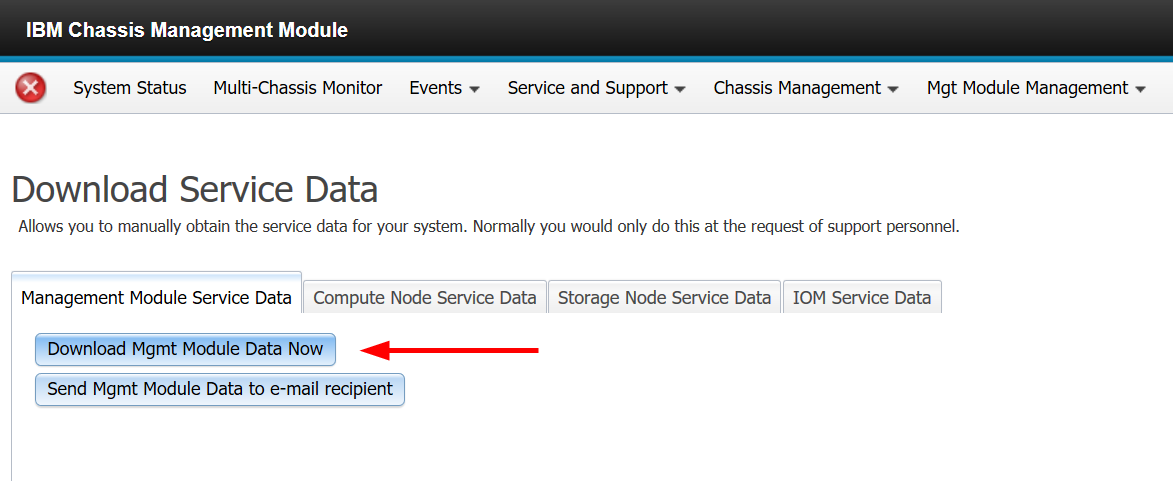
- Click the button Download Mgmt Module Data Now
- This may take a few minutes to complete, then you will be prompted by the browser to save the file to your workstation.